Hi, my name's Freya, and today I’m going to show you how to make a coil pot in the style of Grayson Perry.
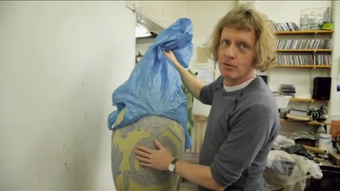
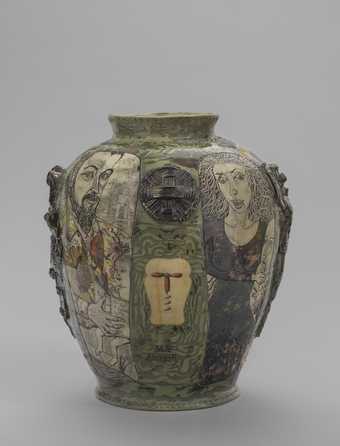
Perry's pots take a classical form and usually have a combination of both text-based and figurative designs. They sometimes include an autobiographical element. You can see images of Perry as Claire, his female alter-ego, and stories from the artist's childhood on the surface of his pots. Perry’s designs explore universally human topics such as identity, gender, sexuality and social status. They often also include references to contemporary culture.
Coiling is a method of creating pottery. It has been used to shape clay into vessels for many thousands of years.
To make a pot like Grayson Perry, you will need: a metal kidney palette, a potter’s knife, mark making tools, a toothbrush, some paintbrushes, a selection of letter stamps, a turntable, some water, a cheese wire, a cloth or tea towel, a rolling pin and measuring guides, earthenware or stoneware clay, a sponge, a pencil and paper, some sandpaper, scissors, soluble wax, transparent glaze, a selection of coloured slips, oxides and underglazes. All of the materials are available mostly online or at your local art supply shop. You will also need access to a pottery kiln.
I’m just going to sketch out my design before I start. Grayson Perry usually always plans out his designs so he knows exactly what he's doing. He usually measures out an accurate plan of the pot in his sketchbook.
Once Grayson has planned his shape, he cuts out a template of the form’s profile. This should be the actual size of your pot. Today we’re aiming for about 8 inches tall. You can use this template as a guide when you’re building your wall.
My design is autobiographical and I’ve gone through my life as a timeline and picked out key parts of my life that have really been important to me. My workplace, family portraits, my university experience. Next, I’m going to decide what shape I want my pot to be.
Grayson Perry usually has fairly traditional forms. That means that the belly is fairly large. It protrudes out of the pot or it has a high shoulder, here. And then the neck is tapered in and is quite narrow in comparison to the lower half of the pot. Make sure that the shape of your pot has enough surface area to include your design.
Now that I’m ready with my design, I’m going to start preparing my clay. I’m going to give it a little knead and then we’re ready to start rolling out the base. Use your cheese wire to slice through the clay. I’m going to knead the clay. Sometimes when you take it out of a plastic bag, it's a bit sticky on the outside and a bit harder on the inside.
We’re going to start out rolling the base. You need to use your piece of fabric. An old sheet or hessian or tea towel. This stops the clay sticking to the surface as you roll it out. I’m going to use my body weight to begin with.
When I’m rolling it out, I’m going to use these two sticks. They’re my measuring guides. As I’m stretching out the clay under the rolling pin, the clay can’t go any thinner than the thickness of these sticks. That's quite helpful for getting an even sheet of clay.
Now I’m going to make my base. You can use anything to cut around. The size of your base is important because you’re going to think about the size of the base in relation to the form. I’m going to start with a small base as I’m going to do a small coil pot today.
Rolling coils is actually not as easy as it looks. Grab a chunk of clay and use your whole hand to squidge it into a thick sausage to start with. We want these coils to be as thick as your finger. Or if you have small fingers, measure with the thickness of your thumb. If we start with nice thick coils as you build the pot, it will have a strength to it. As we refine the walls of the pot we can make it thinner if need be. Start with the tips of your fingers. Long rolls and as the coil gets longer you can stretch your fingertips out and move to the ends.
It’s quite interesting, Grayson Perry actually always coils his work. Most people think that he throws his pots because they’re so well refined and he gets them really symmetrical and even.
Now we’re going to start building the pot. I’ve got my base on a turntable and now we’re going to start sticking our coils onto the base and really quite quickly you’ll see this will build the wall.
We really have to make sure you stick the first coil on to the base properly. If you don’t join properly, they seperate when they’re drying out when it's being fired. Around the outside of this, we’re going to crosshatch it. You can use something like this - a serrated kidney. It doesn’t matter if the crosshatching looks messy. The whole point is for the texture. For the two sides of the clay to squeeze and lock into each other.
Use a little bit of water. You can use water or slip. When you add water to clay you get slip. So either one will do.
Start at one end and push it down with your forefinger and thumb. Blend the end. I’m going to go round. Push the coil into the crosshatching.
I’m just going to blend the first coil. The bottom half of the pot needs to be like a bowl. You need to open it up. See this shape here is a bowl and the wall is gradually getting wider as we come to the top. As you build the wall, with each coil, lean it slightly outward.
I’m going to blend all these coils together. Put one hand on the inside to support it. You can use your thumb or your finger, and blend downwards.
Grayson Perry uses what we call a potter's thumb or spatula to blend his coils together. But use what's most comfortable for you.
Before I carry on building I’m going to let this stiffen up a bit. These are called kidneys, because they’re the shape of a kidney and they’re really good for smoothing out the surface of the clay.
Continue to build the second half of your shape. At this point, you can use your paper template to check if you’re happy with the shape of your pot.
Before I do the skinny neck, I’m going to stop at this point so I can still put my hand in and blend all of this.
Grayson Perry always has very smooth surfaces, so I’m going to thoroughly get all of these bumps out with a serrated kidney.
Now you should leave your pot to stiffen up until it’s leather hard. This means the clay is still damp but a lot sturdier. It’s got a cheese-like texture. You should be able to carve your nail into the bottom of it fairly easily. Remember it’s continually drying, so be sure to catch it at the right time.
If it’s a sunny day, your pot might go leather hard in half an hour, an hour. If it’s cold and there’s a lot of moisture in the air it could take a day usually.
So when you come back to your leather hard vase, that’s if you have left it to go leather hard, just before we start add the other coils for the neck, I’m going to again score it. Add a bit of liquid or slip. Repeat the crosshatching and the water until the clay is soft enough to receive the new clay you’re going to join.
Next it's decoration time. I’m going to make some medulas. These will form the 3D elements which sit on the surface of my pot.
I’m going to take these illustrations and cut them out of clay. I’m going to use any tool to draw out some of the shapes that I want.
I’m going to do a pot because I do pottery. I’m going to do a tree. Make sure that the elements to your medulas are not too thin because when you cut them out it will be really difficult to hold them together if they’re too thin. Keep all the parts fairly thick.
I’ve smoothed out the edges of my medulas to make them a little bit neater.
Once you know where they’re going to go, you trace out the shape , roughly, so that you know where to crosshatch.
I’ve got a sprig mold. It gives me this little self-portrait of my father that I’m going to stick on. It’s a mold. We’ve sculpted the face and then made a little plaster press mold of it. They’re fairly simple to use, but that will take a whole other day to make these.
I’ve stuck all of my medulas and sprig molds on and now I’m smoothing them out with a damp sponge.
Slips are a liquid clay. With this liquid clay we add stains and oxides so that we have a different colour. These are going to be my background tones that I fade into the pot.
I’ve chosen a selection of green tones for the base. I’m going to layer this on top of the white. I've got an apple green and an army green. But I am going to add some bright colour to mine because that represents parts of my personality.
Now I’m going to add a darker green and grey, to add some faded depth.
Now, it’s a good idea to put two layers of slip on. As you paint it on is as it will be and you can see the paint strokes. I’m going to put two layers of slip on so that I no longer see the clay underneath the slip. When they’re touch dry, you can build these colours up.
Grayson Perry usually would paint on the background layers of slip first and then place on his 3D medulas. I’ve done it the other way around. Either way you’re going to have a case of refining the edges of where the paint meets the medula.
I’m going to go around the edge with a wooden tool and remove the slip from the surface of the medula. At the same time I can outline it as part of the illustration style.
You can do the carving by using a potter’s knife, wooden tool or a pin-like tool.
I think Grayson Perry uses his own stamps, but I've purchased a plastic set of letters. I’m going to push these into the surface of my pot to add the text part of my design.
Perry has said that you have to ‘throw all of your experience, all your personality into making your pot’. I like to see this almost as a diary. How could you reflect your personality in your pot?
When you’re happy with the surface of your pot, pierce the sprig medulas with a small hole. This releases any air trapped inside. Do this immediately so you don't forget.
Now you need to leave the pot until it’s bone dry. It can take a couple of days for all the water to evaporate.
Once the pot is bone dry, you can put it into the kiln to be bisque fired at 1000 degrees. This first firing increases in temperature slowly to evaporate all the moisture and release any air.
The pot has just had its bisque firing to 1000 degrees, so the state of the clay is really quite porous. It’s almost like it’s been half-cooked and that helps to hold the glaze on.
Use your sandpaper to file off any rough edges and smooth off the blurring from around the carvings. It’s important that I sponge off the dust, otherwise sometimes the glaze crawls off if there’s dust underneath it.
If you have soluble wax, you can put wax on the base of the pot to resist the glaze. If you don’t have wax, you can just sponge the glaze off the base of the pot.
First, I’m going to brush on my underglazes and oxides into the carvings. This is called inlay. Then sponge off any messy sections. Remember you have slip on the pot which can be hard to see at this stage but feel free to add further tones of colour on and around the medulas to help them pop. You can also inlay underglazes or oxides at this stage.
Once this is dry, dip your pot into the transparent glaze. This gives the pot a glossy finish. I use my hands, but you can use a whisk of some sort to mix-up the glaze thoroughly.
It usually takes just moments to dry. Once your pot is ready it can now be glaze fired.
The pot goes back into the kiln at 1260 degrees to be glaze fired. Now I’m using stoneware clay. Depending on your clay type this temperature will differ.
This is hot enough to seal all the fine pinholes where the water once was and melt the glaze into that glassy finish. My firing is set to take around 24 hours. 12 hours for the temperature to reach its peak and about 12 hours for it to cool.
There you go. That’s it finished. Wow. It’s always a surprise when it comes out the kiln.
That was how to build a coil pot in the style of Grayson Perry. I hope you’re inspired to have a go.
A bit of background
Turner Prize-winning artist, Grayson Perry is known for his ceramic vases and tapestries. Perry’s coil pots have complex surfaces which use a range of techniques. For this pot we’re going to follow a process of sgraffito, inlay of underglaze and oxide, and a single bisque fire and glaze fire approach.
The whole process can take up to a couple of weeks, depending on the speed in which you wish to work and drying times, and is suitable for anyone who is new to pottery.
Sir Grayson Perry CBE RA
My Gods (1994)
Tate
Quick guide to pottery terms
Pottery that has been fired but not yet glazed.
The condition of clay when all the water has evaporated. The clay is completely dry and ready to be fired. At this stage, the clay is very fragile and porous.
A method of forming pottery by building up the walls with coils of rope-like rolls of clay.
The process of heating pottery in a kiln to at least a glowing or white heat. Firing permanently transforms the clay to a rock-like state and melts glazes.
A mixture of various materials and colorants, which are ground into a fine powder, mixed with water, and applied to ceramic pieces. When exposed to high temperature during firing, this mixture will melt and form a glass-like coating.
A furnace for the firing of ceramics.
A step in preparing clay for shaping. It involves manipulating the clay in a fashion somewhat like kneading dough for bread.
The condition of clay when it has been partially dried. At this stage, the clay is still visibly damp (usually a darkish gray) but has dried enough to be able to be handled without deformation. It is dry to touch, but it feels cold and has a cheese-like texture. You should be able to carve your nail into the bottom of it fairly easily.
On average it will take around 1-3 days for clay to become leather hard. However, this does depend on how you are storing and drying it.
This is a decorating technique where a slip is applied to a leather-hard piece of clay and left to dry. Once the slip is dry a host of different tools are used to carve into the clay to remove the slip and leave an embedded decoration behind.
A liquid mixture or slurry of clay and/or other materials suspended in water.
Slip is used for decorating pottery, as a glue to paste pieces of pottery together, or to cast in a plaster mold.
Pottery pigment applied on to bisque or clay and covered with transparent glaze before firing. It often has a matte finish.
Are you ready to make a pot like Grayson Perry?
Here's a list of top tips to guide you through the process ...
All of these materials are available mostly online or at your local art supply shop.
- a metal kidney palette (or a plastic card for the smooth edge and a fine, plastic hair comb for the serrated edge)
- a potter’s knife
- mark making tools (tweezers, chopsticks, a fork and kitchen knife work well for decor work)a toothbrush
- some paintbrushes
- a selection of letter stamps
- a turntable
- some water
- a cheese wire (or thread /string strong enough to slice through clay)
- a cloth or tea towel
- a rolling pin and measuring guides
- earthenware or stoneware clay
- a sponge
- a pencil and paper
- sandpaper
- scissors
- soluble wax (or masking tape)
- transparent glaze
- a selection of coloured slips, oxides and underglazes
You will also need access to a pottery kiln. You can often find these at art colleges or other community groups.
Try leaning on the clay to flatten it. This saves a bit of your energy which you need plenty of when working with clay.
When joining your coils, you want the clay to marry together. To achieve this, try to match their water content.
Scoring gives texture for locking pieces of clay onto one another. The depth of the mark allows the water to penetrate deeper and soften the roots of the area.
As the pieces of clay dry, they shrink and move together. The more they sink into one another, they less they'll repel further down the line and the stronged the bond will be.
Sprigs are useful for repeating the same print but aren't necessary. If you do want to experiment with using sprig molds, they can be purchased online or from an arts supply shop.
Because slip is a liquid clay it needs to be applied when the clay is still wet – in its malleable or leather hard state. If the slip does not dry in sync with the rest of the pot, the related difference will show as the slip peels off and does not adhere to the surface.
Slip is good for layering texture and is open to a whole list of decorative techniques, including inlay and sgraffito.
Underglaze is a fairly stiff paint and has no movement to it. How you apply it, is how you it will appear in the end result. These are easy to use for illustrative, intricate designs that you need to stay put and not distort during the firing.
It’s important to make sure your pot is dry before it goes in the kiln, otherwise you run the risk of the water turning to steam. This builds up a pressure which needs to escape and runs the risk of your pot exploding.
Unfortunately sometimes things can go wrong in the kiln, but with enough practise and professional supervision, mistakes are eliminated. You also learn that mishaps are part of what makes the process fun.

